Archived: Building ArduPilot for Pixhawk on Windows or Linux with QtCreator
Warning
ARCHIVED ARTICLE
ArduPilot no longer supports Qt Creator.
This article shows how you can set up Qt Creator for editing ArduPilot code and building for Pixhawk targets on Windows and Linux.
Preconditions for Linux
Follow the instructions in Building for Pixhawk on Linux with Make to download the required source code (ardupilot, PX4Firmware and PX4NuttX) and toolchain.
Preconditions for Windows
Follow the instructions in Pixhawk on Windows with Make to download the required source code (ardupilot, PX4Firmware and PX4NuttX) and toolchain.
Make sure you have no Cygwin installed (or have it at least out of the environment variables), as this can get in the way of the PX4 toolchain.
Install Qt Creator
Download Qt and the Qt Creator IDE from the Qt Creator website
Follow the instructions to install the IDE on your platform.
Run Qt Creator on Windows
We try to make sure that Qt Creator is running with all the necessary environment variables that are needed to build an ArduPilot project.
Go to your local PX4 toolchain directory and create a file called qtcreator.sh.
cd /path-to-your-qt-creator-dir/bin
qtcreator.exe
Go to the toolchain\msys\1.0 subdirectory of the PX4 toolchain directory and make a copy of the file px4_console.bat , called px4_qt_creator.bat. Change this file in :startsh section, so that it becomes:
:startsh
if NOT EXIST %WD%sh.exe goto notfound
start %WD%sh --login -i -c qtcreator.sh
exit
Optional: create a Windows shortcut to the px4_qt_creator.bat for easy access.
Start up Qt Creator by starting up px4_qt_creator.bat
Run Qt Creator on Linux
If you installed the gcc-arm cross-compiler and made sure that the cross-compiler is in your path, then it suffices to simply start up Qt Creator.
Create a project
Select File -> New File or Project.
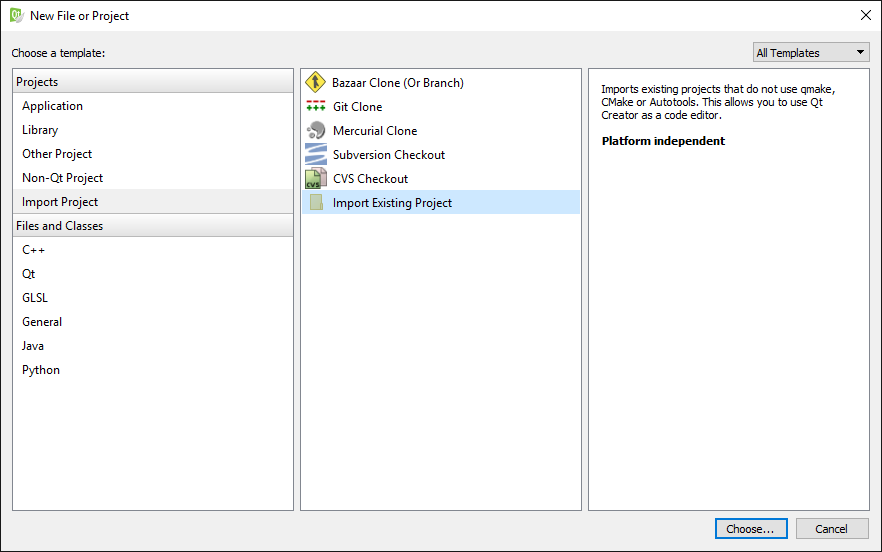
Choose the Import Project template and from these templates Import Existing Project. Then press Next.
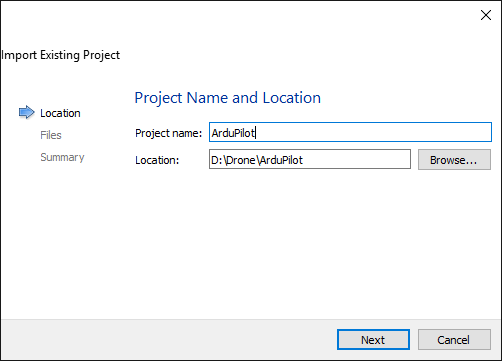
Enter a project name and choose the location of the ArduPilot Git repository. Then press Next.
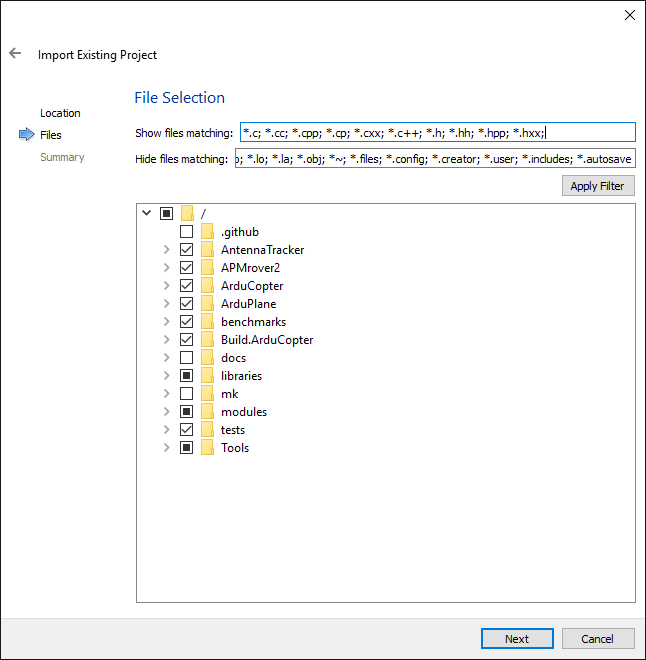
Qt Creator shows you the files that will be imported into the project. Just press Next (we will worry about this a bit later).
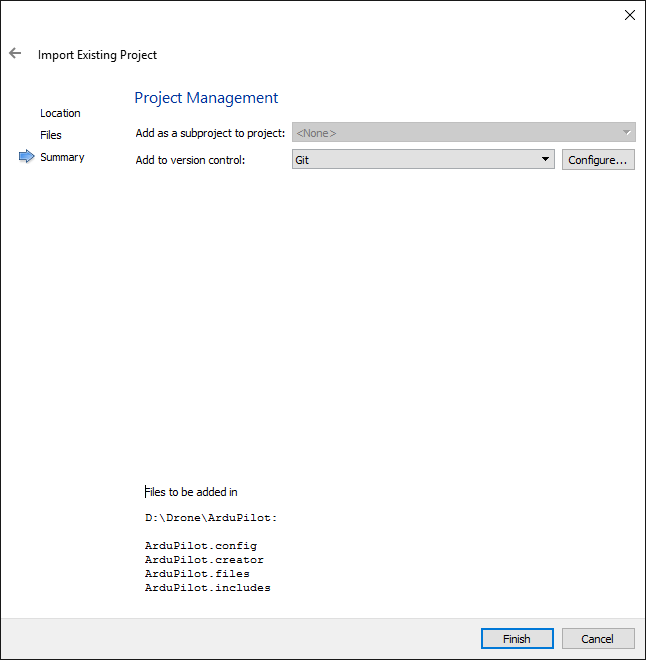
The summary of the project settings is shown in the next screen. It is interesting to see which files are generated:
the .files file contains all the files that need to be edited.
the .includes file contains all directories containing header files that might be useful to consult during development.
Update the project with Git hooks
A fixed project is not useful, because files can get renamed or be added or removed by commits from other contributors.
Therefore, it is useful to let the Qt Creator project be updated each time a new incoming change from a remote repository updates your own repository.
The tactic is that we first create a “project generation script” that will update the project’s .files and .includes files and then let Git hooks call this script each time when it assumed to be appropriate.
Windows script
Create a file called generate_ardupilot_project.bat:
@echo off
cd ArduCopter
dir *.cpp *.hpp *.ipp *.c *.h /b /s > ..\ArduPilot.files
cd ..
cd AntennaTracker
dir *.cpp *.hpp *.ipp *.c *.h /b /s >> ..\ArduPilot.files
cd ..
cd ArduPlane
dir *.cpp *.hpp *.ipp *.c *.h /b /s >> ..\ArduPilot.files
cd ..
cd APMRover2
dir *.cpp *.hpp *.ipp *.c *.h /b /s >> ..\ArduPilot.files
cd ..
dir *include* /A:D /s /b > ArduPilot.includes
dir *libraries /A:D /s /b >> ArduPilot.includes
Linux script
Create a file called generate_ardupilot_project.sh:
cd ArduCopter
find . \( -name "*.cpp" -o -name "*.hpp" -o -name "*.ipp" -o -name "*.c" -o -name "*.h" \) > ../ArduPilot.files
cd ..
cd AntennaTracker
find . \( -name "*.cpp" -o -name "*.hpp" -o -name "*.ipp" -o -name "*.c" -o -name "*.h" \) >> ../ArduPilot.files
cd ..
cd ArduPlane
find . \( -name "*.cpp" -o -name "*.hpp" -o -name "*.ipp" -o -name "*.c" -o -name "*.h" \) >> ../ArduPilot.files
cd ..
cd APMRover2
find . \( -name "*.cpp" -o -name "*.hpp" -o -name "*.ipp" -o -name "*.c" -o -name "*.h" \) >> ../ArduPilot.files
cd ..
find . -type d -name 'include' > ArduPilot.includes
find . -type d -name 'libraries' >> ArduPilot.includes
Git hooks
Open a command line interface and browse to the .git/hooks subfolder in the project folder.
Change the post-merge and post-checkout files so that they become:
#!/bin/sh
./generate_qt_creator_files.bat
exit 0
Another option is to make symbolic links in between the Git hook files and the generation script. In Linux for example, that is achieved by:
ln -s ./generate_ardupilot_project.sh ./.git/hooks/post-merge
ln -s ./generate_ardupilot_project.sh ./.git/hooks/post-checkout
Build the project
This section discusses how to build the code in Qt Creator.
Click on Projects on the left pane and make sure that you are in the Build & Run tab page.
Click Manage Kits in the topleft corner.
First click on the Compilers tab page and then Add on the right hand side of the compilers list. Choose an easily recognisable name for your compiler and make sure the Compiler and Make path are referring to the executables of the PX4 toolchain (Windows) or the downloaded gcc-arm cross-compiler (Linux). Also choose “GCC” as the Error parser.
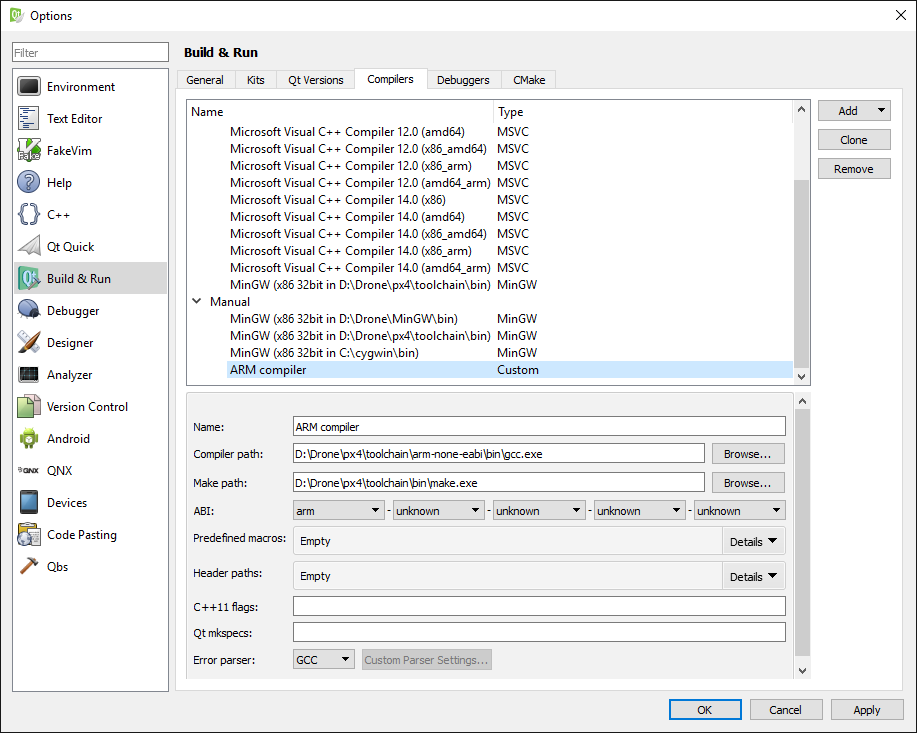
Then click on the Kits tab page. Click Add on the right hand side.
Choose an easily recognisable name for your build kit and make sure you fill in the proper compiler (the one you just added) and the debugger inside the PX4 toolchain.
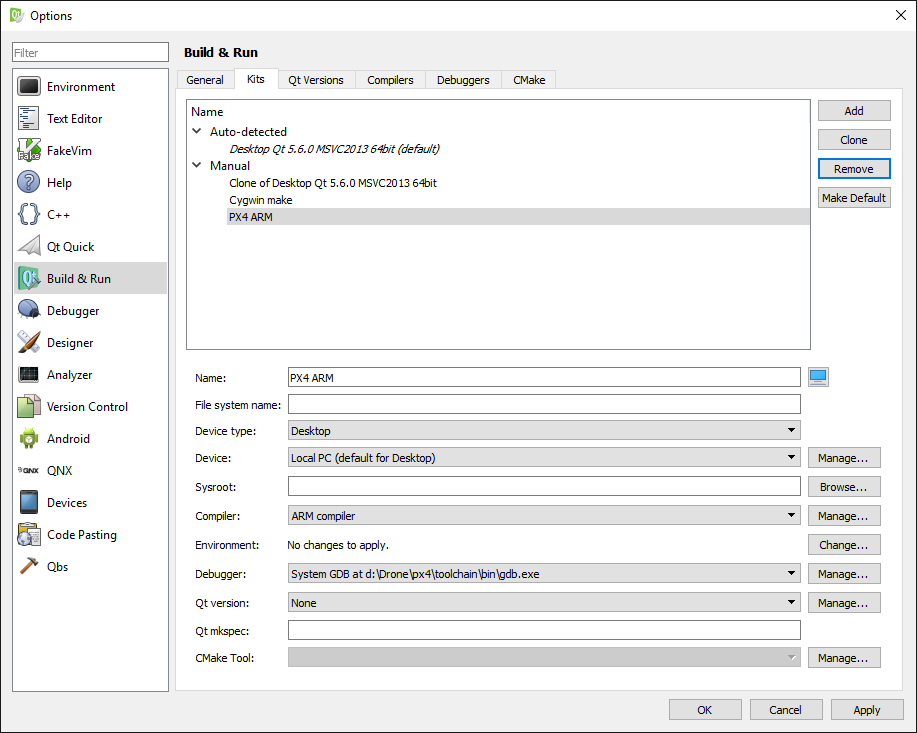
Click Apply.
Back on the Projects page, click Add Kit and choose the Build Kit you just added.
Now you have one “Build Configuration” called “Default”. You can make as many Build Configurations as you want, but we’ll take the ArduCopter build as an example for now. Next to Edit build configuration, click on Add and choose Clone Selected in the drop down menu. Pick a name (e.g. “Copter”).
Click on the Details of the Build Steps and type “px4-v2 -j2” as Make arguments. Deselect the Targets.
Click on the Details of the Clean Steps and type “px4-clean” as Make arguments. Deselect the Targets.
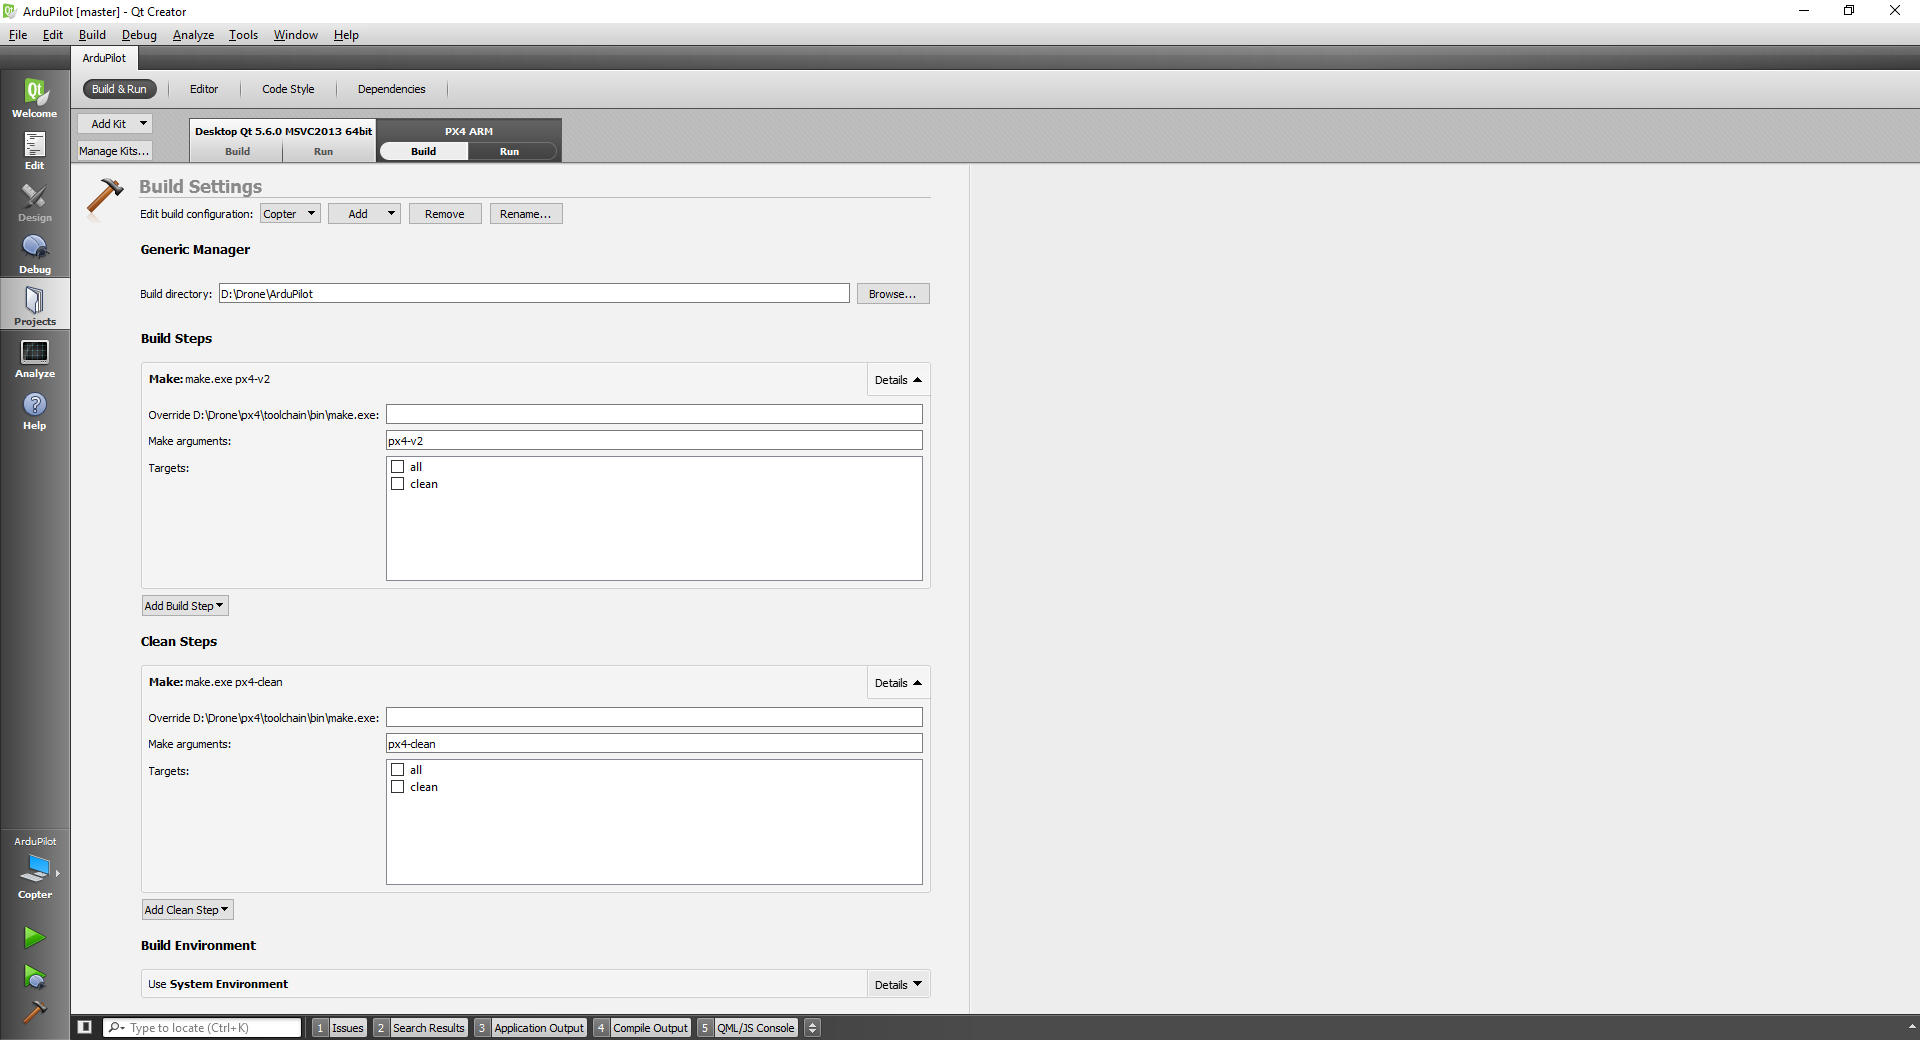
You can make other build configurations for e.g. ArduPlane in the same way. You can quickly switch between “Build Configurations” by clicking the logo just above the Run icon (the green arrow) on the left pane.
You can now remove the MSVC or standard GCC build kit (click on the down arrow on the kit itself and choose Remove Kit).
You’re now ready to build the code. Click on Edit in the left pane to edit the code and browse through the project. Click Build project-name in the Build menu (or Ctrl+B) to build the code.
Apply coding style guidelines
It is useful that the Qt Creator editor is configured so that it automatically applies the layout guidelines described in ArduPilot Style Guide.
Indentation: Click on the Tools menu and choose Options. Subsequently, pick the Text Editor view and then the Behaviour tab page. You can set the tab policy (spaces only) and the size of a tab and indentations (4).
Other interesting settings can be found in the C++ view in the same Options dialog. You can define how specific parts of your code will be aligned (e.g. assignments, switch/cases, control statements, braces, etc.)
Commenting: In order to comply with the coding guidelines , you will need to provide documentation in Doxygen format. Qt Creator will automatically generate a Doxygen documentation template if you type
/**before the definition of the class, function, …