Archived: Qualcomm Snapdragon Flight Kit¶
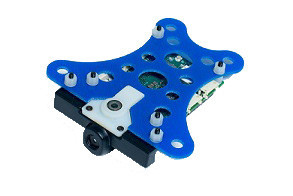
The Snapdragon Flight platform is a high performance CPU autopilot with a two onboard cameras.

Warning
Numerous developers have reported this board is difficult to get working perhaps because of a lack of documentation or issues with underlying software on the board. If you are looking for a high performance Linux autopilot, you may wish to consider the Navio2 instead.
Overview¶
The Qualcomm® Snapdragon Flight™ Kit (Developer’s Edition) is small (58x40mm) but offers a lot of CPU power and two on-board cameras. It contains 4 ‘Krait’ ARM cores which run Linux (Ubuntu 14.04 Trusty, by default), and 3 ‘Hexagon’ DSP cores which run the QURT RTOS. In addition it includes Wi-Fi, Bluetooth connectivity, automotive-grade GPS and many more features.
Warning
Due to some rather unusual licensing terms from Intrinsyc we cannot distribute binaries of ArduPilot (or any program built with the Qualcomm libraries). So you will have to build the firmware yourself: Building for Qualcomm Snapdragon Flight Kit (Dev Wiki).
Specifications¶
Detailed specifications are available on www.intrinsyc.com here (behind a short survey).
System on Chip: Snapdragon 801
CPU: Quad-core 2.26 GHz Krait
DSP: Hexagon DSP (QDSP6 V5A) – 801 MHz+256KL2 (running the flight code)
GPU: Qualcomm® Adreno™ 330 GPU
RAM: 2GB LPDDR3 PoP @931 MHz
Storage: 32GB eMMC Flash
Sensors
MPU: Invensense MPU-9250 9-Axis Sensor, 3x3mm QFN
Barometer: Bosch BMP280 barometric pressure sensor
Optical Flow: Omnivision OV7251 on Sunny Module MD102A-200
Video: Sony IMX135 on Liteon Module 12P1BAD11 (4k@30fps 3840×2160 video capture to SD card with H.264 @ 100Mbits (1080p/60 with parallel FPV), 720p FPV)
GPS: Telit Jupiter SE868 V2 module
Power
5VDC via external 2S-6S battery regulated down to 5V via APM adapter
Interfaces/Connectivity
Wifi: Qualcomm® VIVE™ 1-stream 802.11n/ac with MU-MIMO † Integrated digital core
BT/WiFi: BT 4.0 and 2G/5G WiFi via QCA6234
802.11n, 2×2 MIMO with 2 uCOAX connectors on-board for connection to external antenna
uCOAX connector on-board for connection to external GPS patch antenna
CSR SiRFstarV @ 5Hz via UART
One USB 3.0 OTG port (micro-A/B)
Micro SD card slot
Gimbal connector (PWB/GND/BLSP)
ESC connector (2W UART)
I2C
60-pin high speed Samtec QSH-030-01-L-D-A-K expansion connector
2x BLSP (BAM Low Speed Peripheral)
Dimensions
Weight ?
pcb = 57x40, pcb+connectors+camera=68x52
More details can be found from the Intrinsyc shop.
Connector pin assignments¶
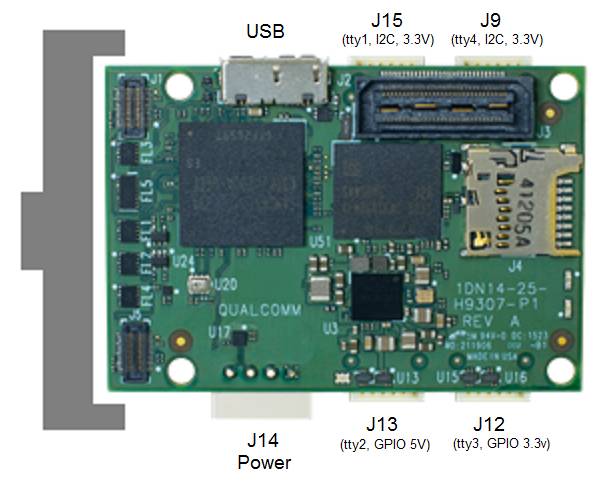
The Qualcomm Flight board has 4 DF13 6 pin UART connectors.
Warning
The pinout is different from Pixhawk!
The pinout for all of the UART is:
pin1: power
pin2: TX
pin3: RX
pin5: GND
The 4 ports are called /dev/tty-1, /dev/tty-2, /dev/tty-3 and /dev/tty-4. The first port is the one closest to the USB3 connector. The ports proceed counter-clockwise from there. So tty-2 is the one closest to the power connector.
The default assignment of the ports is:
/dev/tty-1: RC input (Spektrum satellite only)
/dev/tty-2: telemetry at 57600
/dev/tty-3: RC output (see below)
/dev/tty-4: GPS
3 of the 4 ports provide 3.3V power on pin1, while the /dev/tty-1 provides 5V power (note that pin6 is not ground, unlike on a Pixhawk). You will need to check whether your GPS can be powered off 3.3V. A uBlox GPS is recommended, although any ArduPilot compatible serial GPS can be used.

WiFi¶
WLAN0, WLAN1 (+BT 4.0): U.FL connector: Taoglas adhesive antenna (DigiKey)
J9 / GPS¶
| Pin | Signal | Comment |
|---|---|---|
| 1 | 3.3V | Output (3.3V) |
| 2 | UART2_TX | - |
| 3 | UART2_RX | Input (3.3V) |
| 4 | I2C2_SDA | (3.3V) |
| 5 | GND | - |
| 6 | I2C2_SCL | (3.3V) |
J12 / Gimbal bus¶
| Pin | Signal | Comment |
|---|---|---|
| 1 | 3.3V | - |
| 2 | UART8_TX | Output (3.3V) |
| 3 | UART8_RX | Input (3.3V) |
| 4 | APQ_GPIO_47 | (3.3V) |
| 5 | GND | - |
| 6 | APQ_GPIO_48 | (3.3V) |
J13 / ESC bus¶
| Pin | Signal | Comment |
|---|---|---|
| 1 | 5V | - |
| 2 | UART6_TX | Output (5V) |
| 3 | UART6_RX | Input (5V) |
| 4 | APQ_GPIO_29 | (5V) |
| 5 | GND | - |
| 6 | APQ_GPIO_30 | (5V) |
J14 / Power¶
| Pin | Signal | Comment |
|---|---|---|
| 1 | 5V DC | Power input |
| 2 | GND | - |
| 3 | I2C3_SCL | (5V) |
| 4 | I2C3_SDA | (5V) |
J15 / Radio Receiver / Sensors¶
| Pin | Signal | Comment |
|---|---|---|
| 1 | 3.3V | - |
| 2 | UART9_TX | Output |
| 3 | UART9_RX | Input |
| 4 | I2C9_SDA | - |
| 5 | GND | - |
| 6 | I2C9_SCL | - |
ESC PWM Output¶
To get signals to ESCs or servos you need to use a UART. The default setup is to send 4 PWM signals as serial data on /dev/tty-3.
This firmware will read the UART serial stream and output to the PWM output of the board you use. For example, you could use a Pixracer or Pixhawk board. It is designed to work with this firmware for any ArduPilot compatible board.
Note
Qualcomm/Intrinsyc have released a ESC for use with this board but it has not been tested for use with ArduPilot.
Logging¶
Logs will appear in /var/APM/logs for QFLIGHT ARM port and in /usr/share/data/adsp/logs for the QURT port.
You can copy the logs over WiFi using FTP, Samba, SCP or any other common file copying tool (the board runs Samba by default, so you can just add the log directory to the Samba config file to export it, and then drag and drop from Windows). On QFLIGHT you can also download logs over MAVLink.
Record and display live video¶
Recording and viewing live video from either of the two cameras is possible using the qcamvid application on the autopilot.
Connect the ground station computer to the autopilot’s wifi network (normally appears as Atlanticus_XXXX)
Use an ssh program such as Putty to login into the board
Type the following to record 10 minutes of video from the front camera to /root/video.h264 (other options can be seen by typing
qcamvid -h)qcamvid -c hires -t 600 -o /root/video.h264
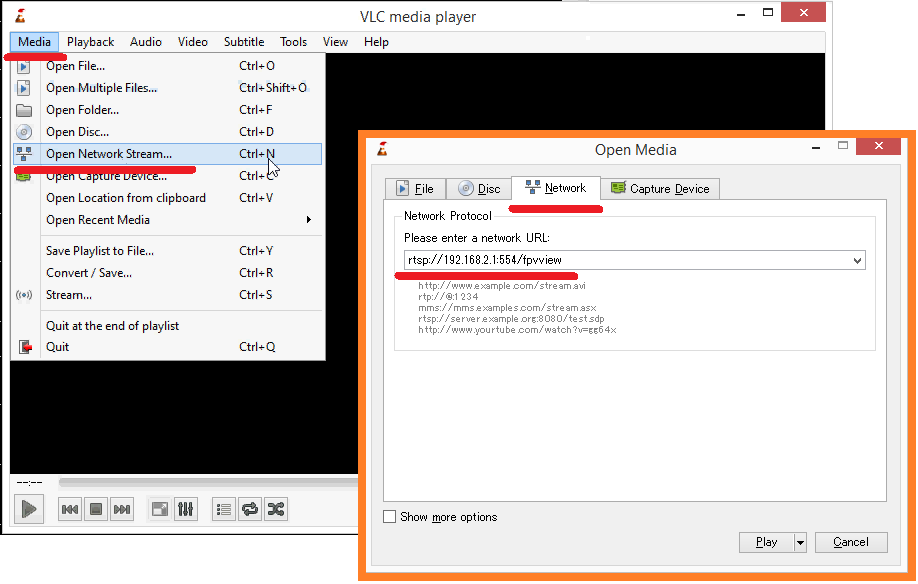
The video can also be viewed in real-time by installing a program such as VLC media player on the ground station computer, and then opening the following network stream.
rtsp://192.168.2.1:554/fpvview

VLC Media Player: Stream Live Video¶