Xacti Gimbals
The Xacti Camera Gimbals are relatively lightweight 3-axis camera gimbals which communicate with ArduPilot using the DroneCAN protocol. Real time video output is available simulataneously through HDMI and USB. Pictures taken include the vehicle’s location (lat, lon, alt) stored using EXIF.
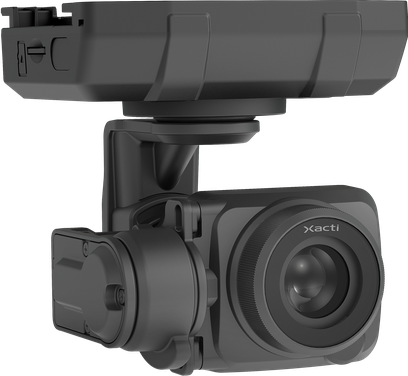
The four supported models are:
CX-GB110 : 20MP RGB
CX-GB210 : 12MP RGB + 640x512 pixel IR
CX-GB310 : Multispectral NDVI
CX-GB410 : 12MP RGB with 2.5x optical zoom
Note
Support for these gimbals is available in ArduPilot 4.5.0 (and higher)
Some images courtesy of xacti-co.com
Where to Buy
These gimbals can be purchased directly from Xacti
Compatible connector and jumper wires are available from digikey
Connecting to the Autopilot
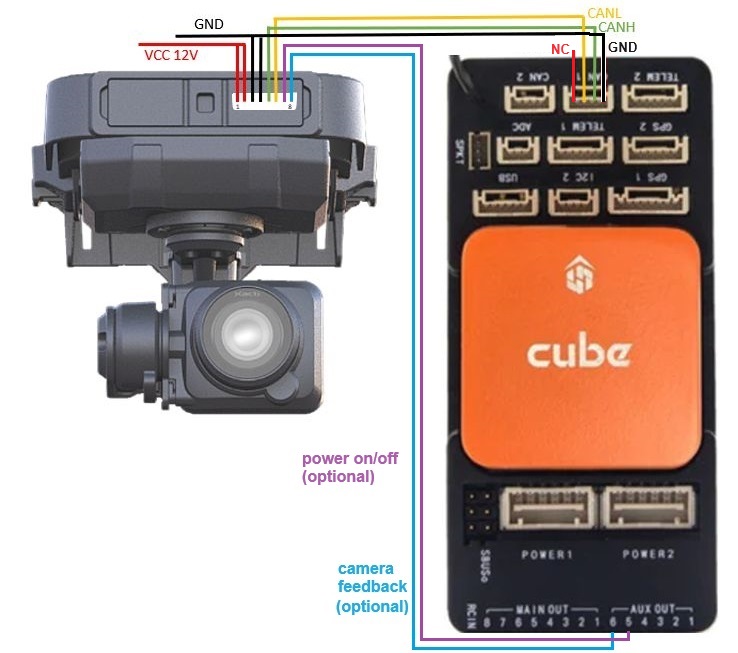
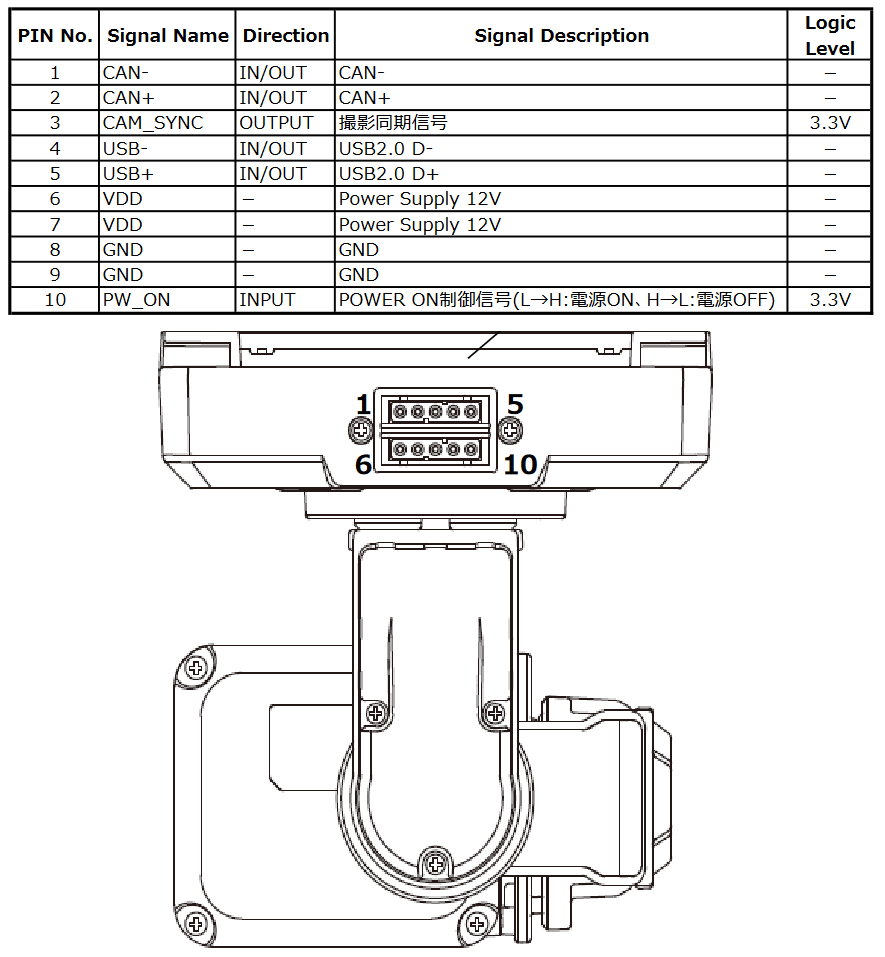
The top image shows how to connect the gimbal’s CANL, CANH and GND pins to one of the autopilot’s CAN ports when using the gimbal mounting plate option. The bottom image shows the camera’s pinout which may be used with a custom designed mount.
Connect to the autopilot with a ground station and set the following parameters and then reboot the autopilot. The params below assume the autopilot’s CAN1 port is used,
CAN_D1_PROTOCOL to 1 (DroneCAN)
CAN_D1_UC_NODE to 1 (only required for Xacti firmwares from before Aug 2023)
CAN_P1_DRIVER to 1 (First driver)
MNT1_TYPE to 10 (Xacti) and reboot the autopilot
MNT1_PITCH_MIN to -90
MNT1_PITCH_MAX to 25
MNT1_YAW_MIN to -90
MNT1_YAW_MAX to 90
MNT1_RC_RATE to 30 (deg/s) to control speed of gimbal when using RC targetting
CAM1_TYPE to 4 (Mount)
CAM1_INTRVAL_MIN to 1 (second)
RC6_OPTION = 213 (“Mount Pitch”) to control the gimbal’s pitch angle with RC channel 6
RC7_OPTION = 214 (“Mount Yaw”) to control the gimbal’s yaw angle with RC channel 7
Optionally these auxiliary functions are also available
RC9_OPTION = 166 (“Camera Record Video”) to start/stop recording of video
RC9_OPTION = 168 (“Camera Manual Focus”) to adjust focus in and out
RC9_OPTION = 169 (“Camera Auto Focus”) to trigger auto focus
To improve the accuracy of the location EXIF data stored to each image taken, the camera trigger feedback can be enabled as follows
Connect the CAM_SYNC wire (shown in blue in the image above) from the camera to one of the autopilot’s AUX OUT signal pins (e.g. AUX OUT 6’s bottom row pin)
CAM1_FEEDBAK_PIN to 55 (AUX6) (if connected to AUX OUT 6)
SERVO14_FUNCTION to -1 (GPIO) (if connected to AUX OUT 6)
To allow remotely powering on/off the camera the POWER_ON pin can be connected to an autopilot relay pin (see purple wire in image above) and then set the following parameters (assuming the autopilot’s AUX OUT 5 pin is used)
Connect the camera’s POWER_ON pin (shown in purple in the image above) to one of the autopilot’s AUX OUT signal pins (e.g. AUX OUT 5’s bottom row pin)
RELAY1_PIN to 54 (AUX5) (if connected to AUX OUT 5)
SERVO13_FUNCTION to -1 (GPIO) (if connected to AUX OUT 5)
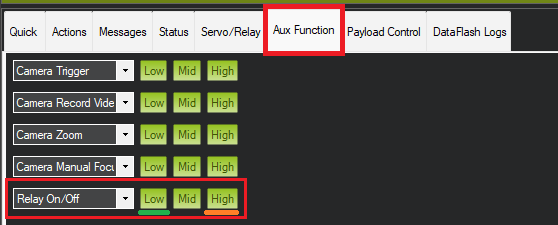
The camera can be powered off/on using an auxiliary switch set to “Relay 1 On/Off” or Mission Planner’s Aux Function screen can be used. Pulling the relay high will turn the camera off, low will turn it back on.
Warning
When the autopilot first detects the Xacti gimbal the MNT1_DEVID will be set to a unique number to identify the gimbal. If the gimbal is moved to another CAN port it may be necessary to manually set MNT1_DEVID to zero and reboot the autopilot in order for the gimbal to be found.
Control and Testing
See Gimbal / Mount Controls and Camera Controls for details on how to control the gimbal using RC, GCS or Auto mode mission commands
Additional Settings
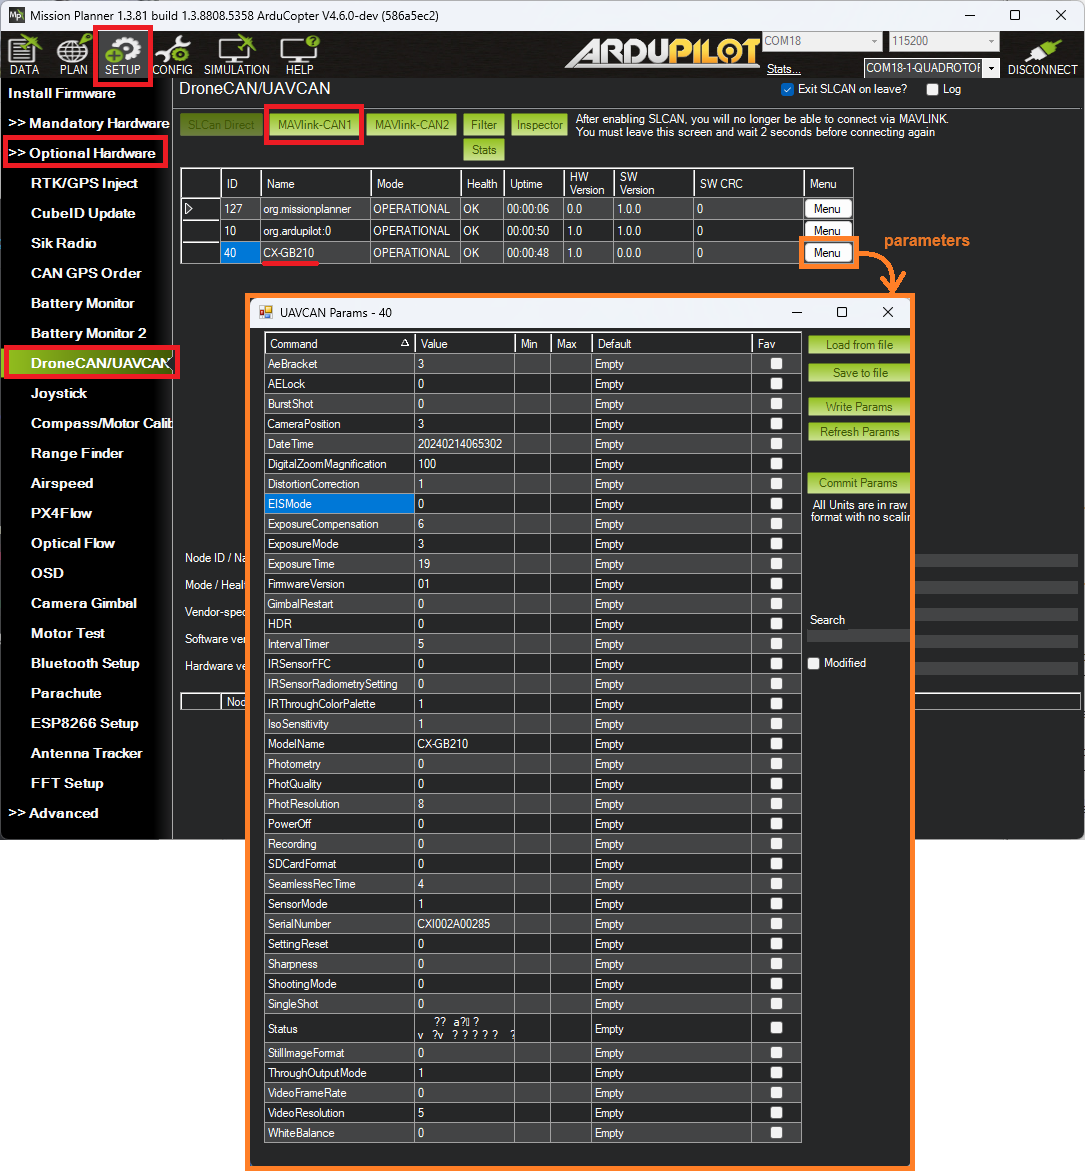
Many more settings not directly supported by ArduPilot can be changed using DroneCAN. If using Mission Planner, use the Setup, Optional Hardware, DroneCAN/UAVCAN screen as shown below.
Firmware Updates
Firmware updates are available from Xacti directly and normally include a “firmware.bin” file and an empty “UPDATE.txt” file. To update the camera:
Power down the gimbal and remove its SD card
Copy the “firmware.bin” and “UPDATE.txt” files to the SD card
Power up the gimbal and wait for at least 10 seconds
Optionally power down the gimbal, remove the SD card and check that the “firmware.bin” and/or “UPDATE.txt” files have been deleted. If either was deleted then the firmware update was successful
Power up the gimbal and it should operate normally
Remote Download of Images
Images and videos captured by the camera can be remotely downloaded to a companion computer (e.g. RPI) via USB using the xacti-config tool
Connect the camera’s USB port to the companion computer
On the companion computer:
Follow the Install Instructions to download, install and compile the tool on the companion computer
Follow the Execution instructions to switch the camera into “msc mode” (mass storage class mode)
The camera’s internal storage should appear as a new drive on the companion computer allowing file copy commands to move the images and videos to a local drive
While in “msc mode” the camera will not respond to DroneCAN commands but it can be restored to normal operation by rebooting it. Please refer to the POWER_ON pin setup under “Connecting to the Autopilot” above