Daiwa Winch

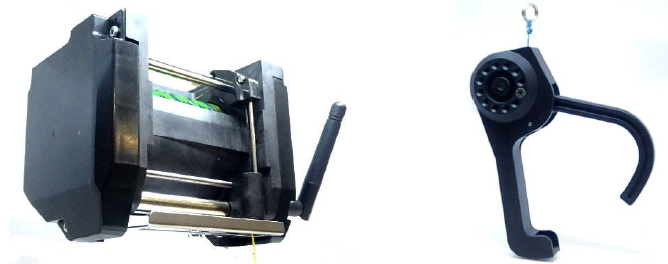
The Daiwa winch is a high quality winch specially designed for drone delivery. The winch includes a “thread end detector switch” that protects against pulling the line in too tightly and thus straining the device or breaking the thread. The gripper includes a spring mechanism that automatically releases the package when it touches the ground.
Weight: 630g
Size: W:110mm H:82mm D:72mm
Maximum Payload: 8kg
Maximum Power: 55W
Input Voltage: 7.2V ~ 22.2V
Interface: 4xPWM or UART
Designed and manufactured in Japan
Note
The driver for this winch will be released with Copter-4.1.0. For earlier versions the winch can be controlled using the autopilot’s servo outputs which allows the winch to be operated from the pilot’s transmitter and/or from DO_SET_SERVO mission commands
Where To Buy
These winches are manufactured by Okaya (japanese site, english site) and can be purchased here (English) or here (Japanese).
Connection and Configuration
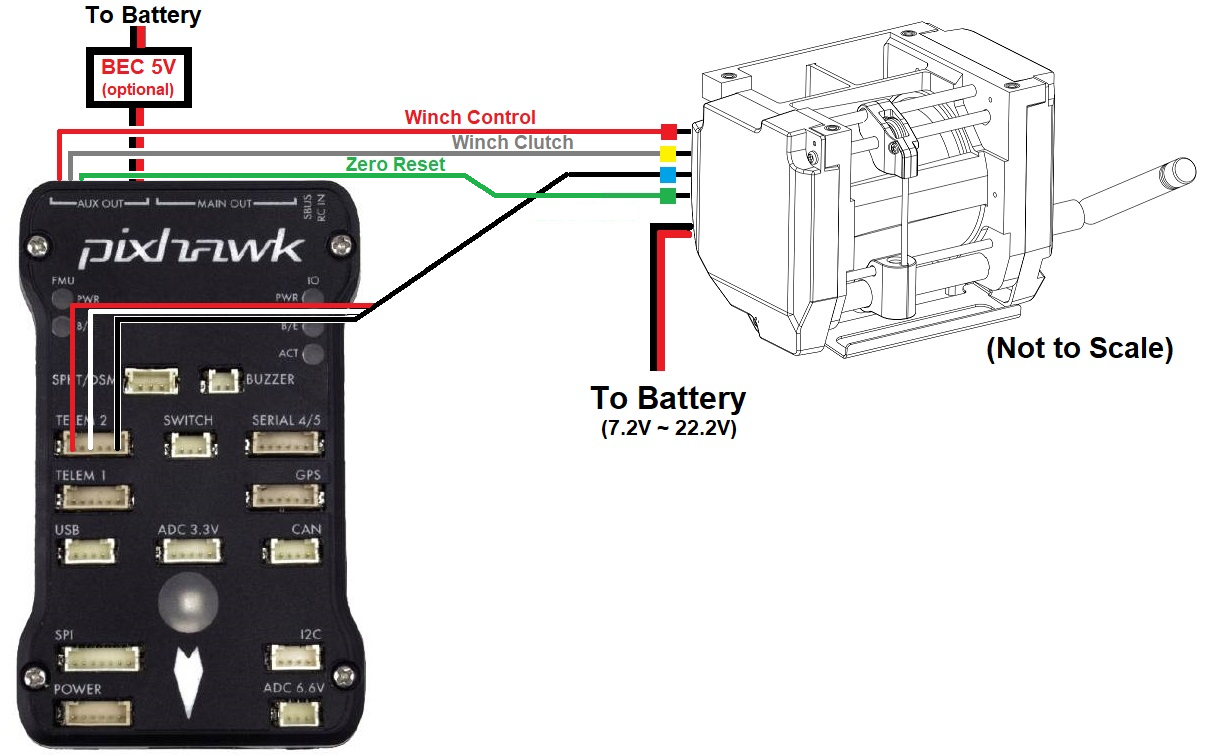
Connect the winch to the autopilot as shown below

Connect the 3-pin Winch Control wire (red cable tie) to AUX OUT 1 (aka Servo9)
Connect the 3-pin Winch Clutch wire (yellow cable tie) to AUX OUT 2 (aka Servo10)
Connect the 3-pin Winch Zero Reset wire (blue cable tie) to AUX OUT 3 (aka Servo11)
Connect the 3-pin Winch Telemetry wire (blue cable tie) to the Autopilot’s Telem2 (or any other telemetry port)
The Zero Reset (green cable tie) used to calibrate the winch should be left disconnected
A 7.2V to 22.2V power supply is required to power the motors
A 5V BEC can optionally be connected to the autopilot’s servo rail to provide power to the winch electronics. This is not required if the Telemetry wire is connected
Set the following parameters
WINCH_TYPE = 2 (Daiwa)
SERVO9_FUNCTION = 88 (Winch)
SERVO9_MIN = 1000
SERVO9_TRIM = 1500
SERVO9_MAX = 2000
SERVO10_FUNCTION = 133 (Winch Clutch)
SERVO10_MIN = 1000
SERVO10_TRIM = 1500
SERVO10_MAX = 2000
SERVO11_FUNCTION = 0 (Disabled)
SERVO11_MIN = 1000
SERVO11_TRIM = 1500
SERVO11_MAX = 2000
SERIAL2_PROTOCOL = 31 (Winch). Note this assumes the Winch’s telemetry is connected to SERIAL2 which is usually TELEM2 on most boards. Note that this does not necessarily correspond to UART2 on some boards.
SERIAL2_BAUD = 38 (38400 baud) or 115 (115200 baud), depending on version of winch.
RC6_OPTION = 45 (Winch Control) to allow controlling the winch speed from the transmitter’s channel 6 knob
RC6_DZ = 30. This deadzone is used to detect whether the pilot has moved the winch control knob to retake control from autonomous operation
RC6_TRIM = The mid value between RC6_MIN and RC6_MAX which is normally close to 1500
RC8_OPTION = 44 (Winch Enable) to allow relaxing the winch by pulling the transmitter’s channel 8 switch low
Winch Options
The WINCH_OPTIONS parameter provides a bit mask of possible configuration options for the winch when the following bits are set in the parameter:
Bit |
Option |
|---|---|
0 |
Spin freely on startup allows the line to be pulled out after startup. This is the current default but is actually quite annoying because we need to remember to disengage the clutch before takeoff or the package will likely be left on the ground. |
1 |
Verbose output sends text to the GCS when any important state of the winch changes (healthy, moving up or down, clutch position, line length). This is in addition to the normal Telemetry winch messages (see below) |
2 |
Retry if stuck (Daiwa only) |
All options are set active by default.
Winch Telemetry
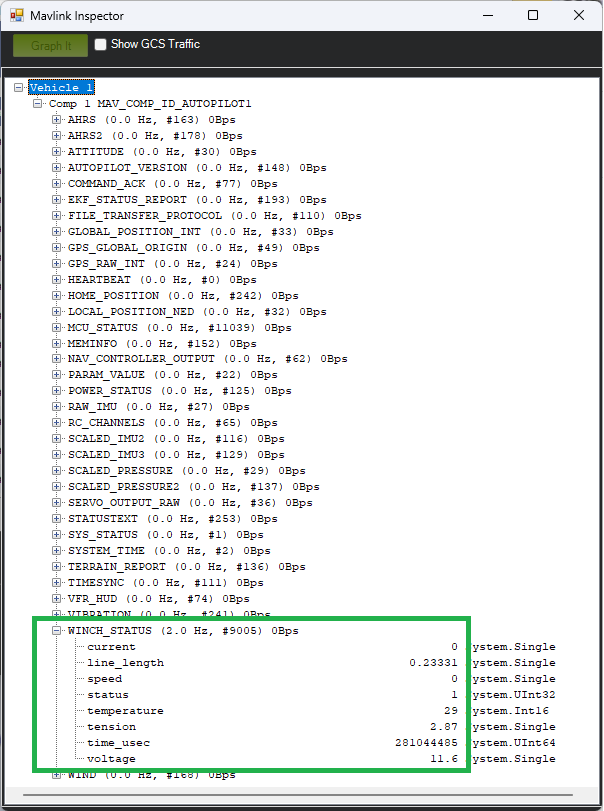
The status of the winch can be viewed in real-time using Mission Planner or QGC’s MAVLink Inspector window. If using Mission Planner push the “MAVLink Inspector” button found under Setup, Advanced.

The winch’s current draw, length of line, current speed (in m/s) temperature and voltage can all be seen.
Zero Reset Line Length
The winch constantly estimates how much line has been deployed and will stop retracting line once this estimated line length has reached zero in order to protect the line from being broken. This estimate is prone to drift however meaning that you may find it impossible to completely retract the line or (less likely) it may retract too far and break the line. To avoid these issues the line length estimate should be periodically reset to zero using the following procedure:
Power on the autopilot and winch
Connect with Mission Planner, open the Setup, Advanced screen and push the “MAVLink Inspector” button and check the current line length.
Retract the line (perhaps using the RC6 tuning knob) to within 20cm or so of the ideal minimum length
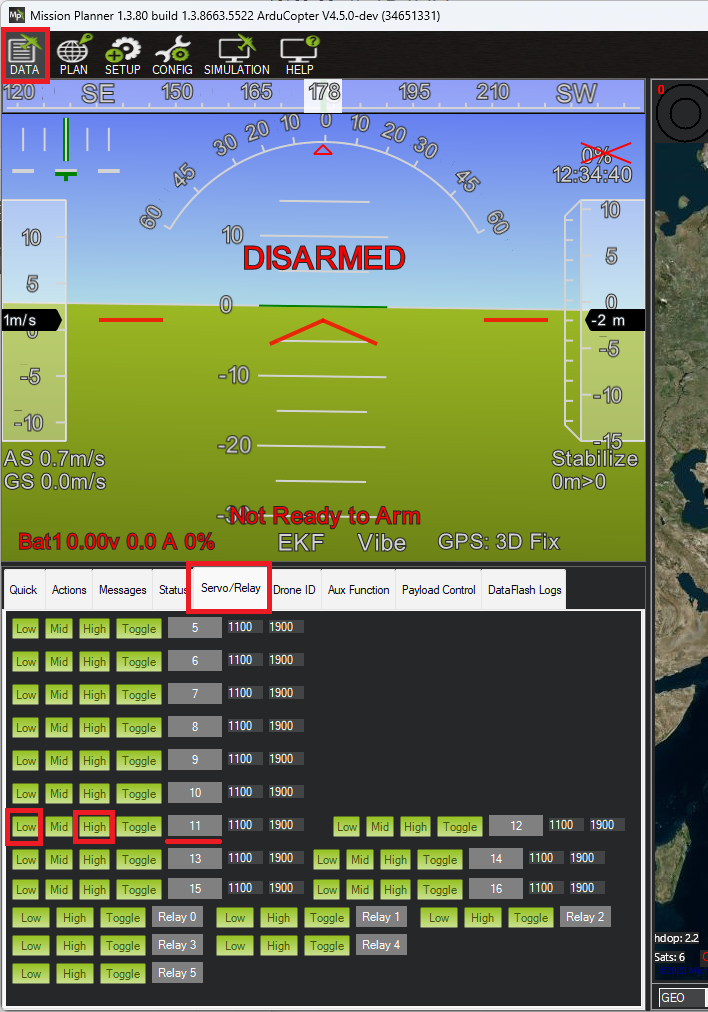
Open Mission Planner’s Data, Servo/Relay tab, find the row for output 11
Push the “High” button to simultaneously retract the line and reset the line length to zero
Push the “Low” button to retracting the line

Control during Missions
The Winch can be controlled during Autonomous missions using the DO_WINCH mission command. See the bottom of the Copter Mission Command List for more details
Winch-test Lua Script
In cases where the vehicle will be well outside of RC range and no joystick is being used, the winch-test lua script may be useful in order to allow manually raise or lower the line using Mission Planner’s Aux Function page.