SITL setup on Windows in a VM (not recommended)
Warning
These instructions are out-of-date. We recommend Windows users follow the instructions for Setting up the Build Environment using WSL and Setting up SITL on WSL
This article explains how to manually set up the SITL ArduPilot Simulator in a virtual machine environment on Windows, and connect it to a Ground Control Station
Tip
See Setting up SITL using Vagrant for a more automated setup process.
Overview
The SITL (Software In The Loop) simulator allows you to run Plane, Copter or Rover without any hardware. The simulator runs the normal ArduPilot code as a native executable on a Linux PC. SITL can also be run within a virtual machine on Windows, Mac OSX or Linux.
This article shows how to manually set up SITL on a Linux environment hosted in a VMware virtual machine. You can use any Virtual Machine provider such a VirtualBox, Vmware, etc.
Note
The instructions were tested on Windows 8 with VMware ver 7.1.0 build-2496824 and Ubuntu 14.10.
Preconditions
Please note that before attempting this you should already have downloaded the code to your machine.
Step #1 - Install VMWare and create an Ubuntu Virtual Machine
Download and install VMware (look for VMware Workstation Player for Windows)
Download the latest Ubuntu version : 22.04 LTS for example.
3. Start VMware and create new ubuntu machine by selecting Player > File > New Virtual Machine
Select the iso you just downloaded
Enter your Full name, User name and Password for the virtual machine. you will use these later when you log onto this virtual machine
Name your virtual machine (i.e. Copter-SITL)
Specify Disk Capacity - leave Max disk size as default 20GB, and “Split virtual disk into multiple files” checked
On next page of “New Virtual Machine Wizard” click the “Customize Hardware..” button
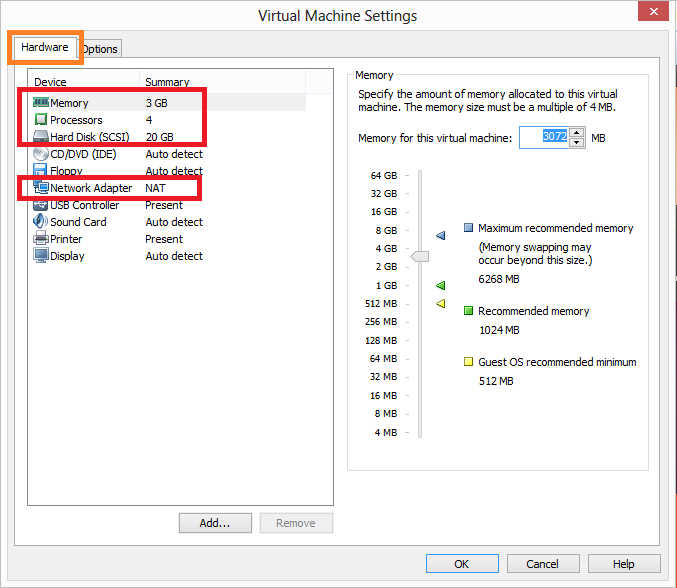
On the Hardware tab set Memory: 3GB,Processors: 4,Hard Disk: 20GB,Network Adapter: NAT
Step #2 - Start the VM for the first time
Power on the machine by double clicking on item just created in the VMware Player
Press “No” to any questions like “Cannot connect to the XXX device because no corresponding device is available on the host”
Enter your password when the login screen appears
Say “no” to any options to upgrade versions
Open firefox and make sure it can access some web page like ardupilot.org
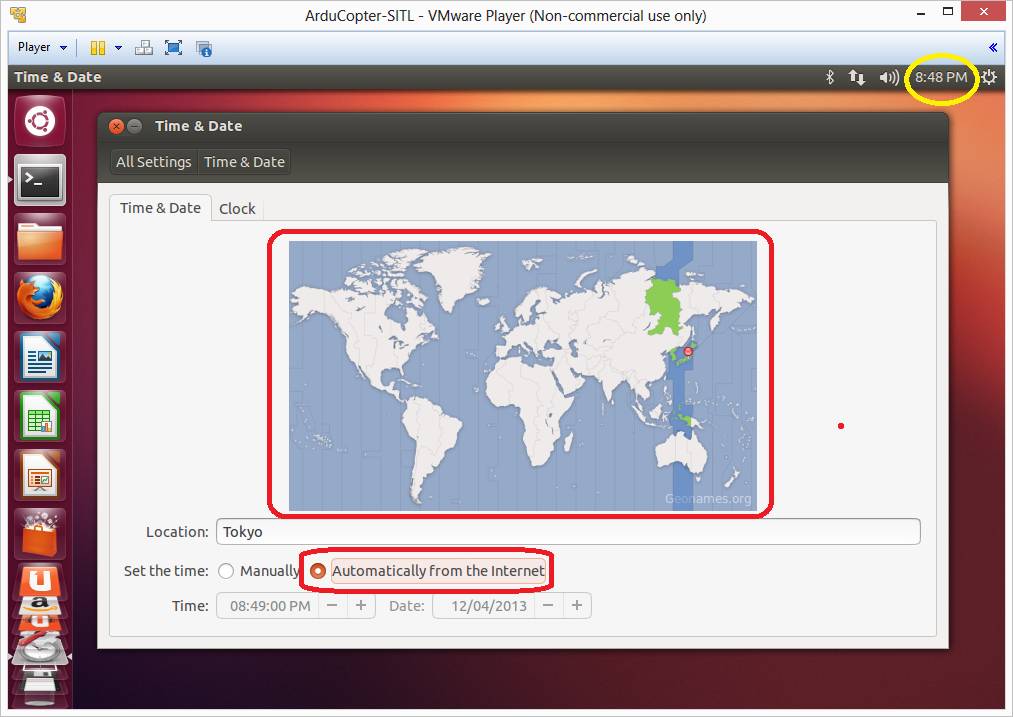
Set the clock by double clicking on the top right corner, select your location on the map and “Set the time:” to “Automatically from the internet”
Setup a terminal short by clicking on the Dash Home icon on the top left, Type “terminal” and then drag the terminal application to the left start pane
Step #4 - Follow the Linux instructions
Now that you have a Linux VM you should follow the SITL instructions for Linux
Connecting with the Mission Planner
In addition to using the mavproxy ground station (the command line style
ground station written in python) it should be possible to connect with
the Mission Planner by appending the --viewerip=XXX.X.X.X to the end
of the start up command where the Xs are replaced with your machine’s IP
address. This address can be found by typing “ipconfig” into a command
prompt.
Note
You will likely see many more than one IP address listed so you may need to try a few different addresses to find one that works.
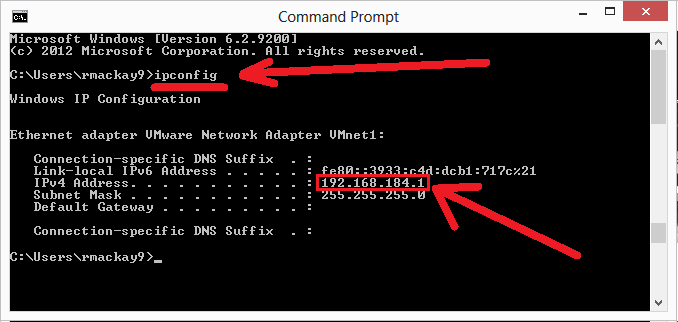
So for this example the following would then be entered into the terminal on the Ubuntu VM while in the ardupilot directory:
./Tools/autotest/autotest.py build.ArduCopter fly.ArduCopter --map --viewerip=192.168.184.1
Next connect with the mission planner after first setting the “COM Port” to “UDP”.
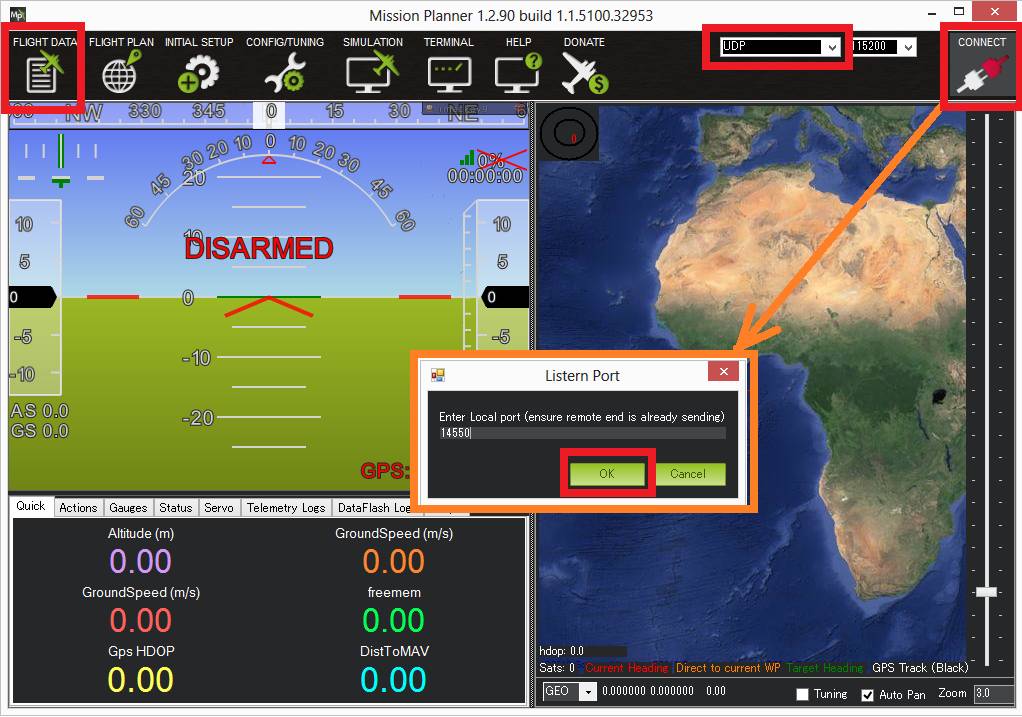
Dataflash logs
After the simulation is run, dataflash logs named “Copter.flashlog” or “CopterAVC.flashlog” will be created the “buildlogs” directory. This directory is created at the same level as the ardupilot directory (i.e. the top level directly that holds the “Copter”, “Plane” and “libraries” directories). Because of the inconvenient name you’ll need to change the file extension to “.log” before opening in Mission Planner.
Next steps
To get the most out of SITL we recommend you read the MAVProxy documentation.
The topic Using SITL for ArduPilot Testing explains how to use the simulator, and covers topics like how to use SITL with Ground Stations other than Mission Planner and MAVProxy.
